


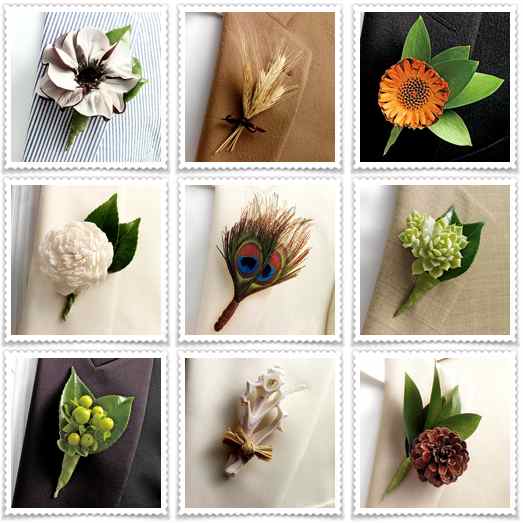
· Blooms for boutonnieres
· Bucket
· Floral wire
· Green waxed floral tape
· Ivy leaf, fern frond, or other greenery
· Pearl-tipped corsage pins
· Pencil
· Resealable plastic sandwich bag
· Ribbon in a complementary wedding-day colour (optional)
· Stem cutter or sharp knife
· Stem stripper
· Wire cutters
STEP 1: Selecting & Preparing the Bundles of Blooms
Pick your bundles of bouquets. Remove excess foliage and thorns, and pull off damaged petals. Fill a sink or bucket with water, and holding the stems underwater, use the stem cutter or knife to cut the stems at an angle about two inches from the bottom. Allow the flowers to drink for a few seconds with the stem ends underwater, then place the stems in a bucket filled halfway with cool water until you are ready to use them. Note: If you are working with roses and the heads aren't open yet, you can force the blooms open by placing the stems in a bucket of hot water; do this only for a couple of minutes just before you are going to use the roses, otherwise you might kill them.
STEP 2: Choosing & Preparing Particular Flowers
Choose a particular stem and/or flower for the boutonniere. Use a stem cutter or sharp knife to cut the stem to a length of approximately three inches. Create a bed for the flower: Take an ivy leaf, fern frond, or other bit of greenery and place it behind the flower. Knot Note: The bed should not extend much beyond the top of the flower and should be visible from the sides. Place a six-inch piece of wire behind the stems.
STEP 3: Crafting the Boutonniere
Prepare the stems: Starting from the top of the stems, begin to wrap floral tape down the stems in a spiral to secure them together; wrap until about 3/4 of an inch is covered. Trim away the excess stem and continue to wrap floral tape around the wire about three inches down, then wrap the tape back up toward the flower head. Once you're back at the top, wrap tape around several times to be sure it's secure. Trim the excess tape.
STEP 4: Securing the Boutonniere
Finish the boutonniere stem: Trim the wired and wrapped stem so the total length is about 1 1/2 inches. Curl the end around a pencil point and pinch the tip to finish it. Attach a ribbon bow (if you like). Depending on the weight of the boutonniere, insert one or two pearl-tipped pins into the stem to use later for attaching it to the lapel.
The boutonniere is now complete! Mist it with water and place it in a resealable plastic sandwich bag (blow a puff of breath into the bag before you seal it to provide airspace around the boutonniere). You can place up to two boutonnieres in the same bag.
{KIM'S FOOD FOR THOUGHT}
Decide if you prefer to make your boutonniere with real or fake supplies.
Real flowers will give you a more realistic look, where as fake flowers will
be easier to work with and can be made ahead of time.
Besides using just flowers, check out other items such as
buttons, leaves, feathers, shells, beads, fabric, or even wire. Be creative!
Instead of pinning your beautiful DIY boutonniere on with a pearl pin,
find a beautiful brooch that sets the theme for your event.
The ladies can even wear these instead of corsages and
the brooch will then become a keepsake for them.
Don't want to DIY? Check out some of these creative designers on Etsy
Photos compliments of InStyle Weddings
1 comment:
lovely and clever DIY!
Post a Comment