Showing posts with label Cake. Show all posts

Wednesday, March 24, 2010

Champagne and Pink Baby Shower

I thought I would include some more pictures of my above and beyond incredibly wonderful baby shower last month.  I just couldn't resist bragging a little about how wonderful it was to spend the day with my amazing family and friends!! :)
Picture 3

Picture 5

Picture 4

Picture 6

Picture 7

Picture 8

Picture 9

And once again - photography by the uber talented Shelly Ivy from Ivy Studios!

Tuesday, December 1, 2009

{Holiday Crafts} Countdown Chain


Picture 5

Today marks the first day of December which means it's time to start counting down to your favorite end of the year holidays. What could be a cuter way then with this adorable cookie countdown chain? And the best part is you get a delicious little snack each day.

Have fun and write on each cookie wrapper the date and the fun holiday

December 1st - World Aids Day
December 2nd - National Fritters Day
December 3rd - International Day of the Disabled Person
December 4th - National Cookie Day
December 5th - Walt Disney's Birthday

December 6th - St. Nicholas Day
December 7th - Pearl Harbor Day
December 8th - National Brownie Day
December 9th - First Christmas Seals Created
December 10th - Human Rights Day
December 11th - Hanukkah Begins
December 12th - Poinsettia Day

December 13th - National Cocoa Day
December 14th - South Pole Discovered
December 15th - Phonograph Patented
December 16th - Boston Tea Party Anniversary
December 17th - National Maple Syrup Day
December 18th - Muharram 1 (Islamic New Year)
December 19th - Oatmeal Muffin Day

December 20th - Games Day
December 21st - First Day of Winter
December 22nd - First Christmas Lights for Sale (1882)
December 23rd - Festivus
December 24th - National Egg Nog Day
December 25th - Christmas
December 26th - Boxing Day / Kwanzaa Begins

December 27th - Visit the Zoo Day
December 28th - National Chocolate Day (Celebrate BIG!)
December 29th - Saint Thomas of Canterbury Feast Day
December 30th -  Oh My! Day
December 31st - New Years Eve

HAPPY NEW YEAR

I found this adorable gingerbread chain on HomemadebyJill.blogspot.com

Friday, July 24, 2009

EE Celebration | Tuscan Wedding {part 2}

Picture 1

Picture 6

Picture 2

Picture 3

Picture 7

Picture 4


A Very Talented Vendor Team:


Photography -
One Fine Day 


Venue -
Villa Siena


Planner -
Meant2Be Events


Stationery / Details -
The Event Essentials


Entertainment -
SKM Entertainment


Flowers:
Blume Events


Cake:
Piece of Cake


Linens:
BBJ Linen


Wednesday, July 22, 2009

EE Celebration | Automotive Grand Opening

Picture 1


Picture 8


Picture 3


Picture 4


Picture 5


Picture 6


In March, we spent an 5 incredibly long days designing, planning, and coordinating a "Sandsational Grand Opening" celebration for an Sands Chevrolet in Arizona.  Amidst the trying economy, the 12 acre 95,000 square foot dealership opened in late December 2008 with a huge success.  The March celebration started off with a 450 person dignitaries group for a red ribbon cutting ceremony with local city officials and the chamber of commerce.   The show room was filled with vintage cars, the new 2010 Camaro, inspirational speakers, divine food, custom house wine and the melodies of an amazing string quartet.  In case you are wondering, yes, the orange buzzard is a cake.  It was a surprise for the owner of the dealership as his name is Buzz and their mascot is this adorable Buzzard, also named Buzz ---- "Have you Heard the Buzz?!"


Following Friday evening was a 2 day public open house which brought in more than 4,000 people from surrounding neighborhoods.  The kids immensely enjoyed the huge bounce slide, rock climbing walls, sports bounce, smoked bbq and all the raffle prizes that were given away by 2 local radio stations.  And finally, come Monday, there was a beautiful luncheon hosted for the GM Retirees where more than 500 people enjoyed the afternoon reminiscing about past sales days and learning about the new products.  In all, it truly was a Sandsational Grand Opening and we wish many successes to this dealership!! 


Once again - amazing photography by the awesome Ivy Studios - THANKS Brandon and Shelly! You are my rockstar photographers!

Tuesday, July 14, 2009

EE Celebration | Posh Pink Wedding


Often times I am asked what came of the couple whose engagement was caught on film. You can catch me in a reply that they truly had their perfect wedding that she had dreamed of for years, and now I have pictures to prove it.  Congratulations Alicia and Nick!!  Your affair was amazing, elegant, and sincerely filled with many tears of joy.  I am forever thankful to be a part of your love filled affair and will forever treasure the memories -- and look forward to many more!! Can't wait to celebrate with your brand new home that you get to move into tomorrow!

For those of you who would like to revisit the engagement story - click here!

Picture 12

Picture 2
Picture 6

Picture 1


Picture 4

Picture 13

Picture 5

Picture 11

Picture 10

Picture 7


Photography by the very talented Shelly Ivy Studios team


and family photographer friends - Bret Siegel and Lis Thurston 

Saturday, January 17, 2009

{Suckered by a Girl Scout}


I just had to take 2 seconds to post this today because it was too funny not to share!!

*{DING DONG} goes the door bell

* {BARK BARK} goes the three chihuahuas protecting my door

{me} "Hi Sweetie, may I help you" 

{cute little Girl Scout} "Yes, I'm selling Girl Scout Cookies and wanted to know if you would like to buy some."

{me} "They are really yummy, but I am on a diet"

{cute little Girl Scout} "We have sugar free ones"

I got suckered!  She was too cute for words:)  I think mommy was in on a little scheming, but I adored it and bought a few boxes!  ha ha

Tuesday, December 9, 2008

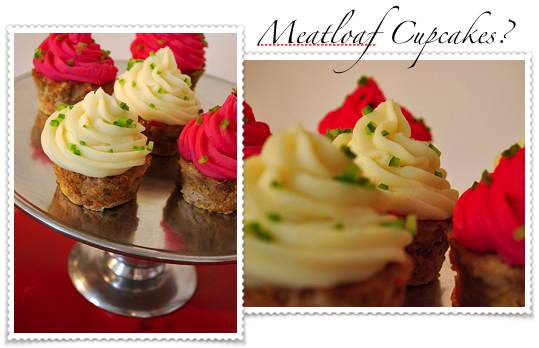
{Meatloaf Cupcakes w/ Potato Frosting}

Thanks Fine Furious Life for confusing me. Cupcakes are suppose to be deliciously sweet and call my name when I'm in a room near them.  However, this is such a creative concept, and I love it because I'm all about cool ways to display normal every day food.  What do you think?

INGREDIENTS

For the “cupcake”:
1/3 lb. ground veal
1/3 lb. ground chuck
1/3 lb. ground pork
1 small carrot, roughly chopped
1 small onion, roughly diced
2 stalks celery, roughly diced
3/4 cup breadcrumbs
1/3 cup milk
1/4 cup chopped parsley
1/4 cup shredded parmesan
2 eggs
Salt and pepper

For the “frosting”:
7.2oz box instant mashed potatoes
Milk, per package instructions
Butter, per package instructions
Beet juice from canned beets
To garnish:
Green pepper, very finely diced
METHOD
For the “cupcake”:

Preheat oven to 350F.
Soak the breadcrumbs in the milk and set aside.
Sweat the vegetables in olive oil until softened. Transfer to a deep bowl and use an immersion blender to puree; alternatively, puree in food processor.
Mix the three meats, eggs, breadcrumbs, parmesan, parsley and vegetable puree in a large bowl until an even consistency is reached.
Place meat mixture in greased muffin tins and bake until brown and shrunken away from the sides, about 20-25 minutes. Remove from tin and cool on rack.

For the “frosting”:
Prepare one sachet of instant mashed potatoes according to package instructions. To prepare the other, substitute beet juice from canned beets for the water called for in the instructions. Allow to cool.
Transfer each batch of mashed potato into a separate pastry bag (or Ziploc bag with a snipped-off corner) with your favourite pastry tip. Pipe onto cupcakes and decorate with diced green pepper.
Reheat in oven or microwave before serving.

Monday, October 20, 2008

{DIY: J is for Jeweled Monogram Cake Topper}

monogram cake topper
Supplies:
Directions:
  • Spread out a piece of wax paper so you don't get glue on anything
  • Roll up a little piece of beeswax into a small ball and place it on the end of a toothpick. This will create a nice adheasive tool for you to be able to pick up your rhinestones.
  • Gently spread out rhinestones on the wax paper next to your custom cut letter
  • Place dots of small amounts of glue on your letter in little sections at a time.  I can dry fairly quickly, so just work in small sections and don't use too much.  It can get messy.  
  • Pick up your rhinestones with the toothpick and beeswax and place them on the glue spots.  Gently press down, but not too hard.
  • Let it sit for a few hours to dry.
BLING it up!

Don't want to DIY, check out these great sites:
ToppersWithGlitz.com {photos above provide from this site}
CoutureCakeJewelry.com

Wednesday, October 1, 2008

{DIY: C is for Cute Cake Stand}

Picture 1

I think when serving cupcakes or mini cakes they look so much better when served on a cake stand. In this tutorial I will show you how to make a cake stand that is very easy and quick to make. You can adapt it to the color or pattern on your cakes. I have used thick gift wrap paper to cover the cake boards. But you could ice your cake boards with rolled sugarpaste/fondant icing instead. Only remember to ice the cake board a few days in advanced so they can dry throughly.

Note: remember when you have assembled the cake stand with cakes on it, not to move it around too much.

SUPPLIES:
  • Cake boards: 1×8″, 1×10″, 1×12″ {Note: if you want one more tire on the stand. You will need 1×14″ cake board.Polysthyrene cake dummies 2″ high: 2X5″ and 2×6″. You will need 2×7″polysthyrene cake dummies for one more tire.}
  • Satin ribbon for the cake board and the polysthyrene cake dummies
  • Thick paper or sugarpaste/rolled fondant icing
  • Glue stick and regular glue {Note: use school glue}
  • Metal pins
  • Sharp scissor
  • pencil
Step 1:
Start by glue the dummies together. So they can dry completely.

Step 2:
Take your chosen ribbon, and attach it on the dummies with a metal pin.
Note: you can also glue the ribbon on. But I want to use the dummies again. So therefor I have not glued my ribbon on

Step 3:
When the dummies are dry, start by wrapping the ribbon around them so it slightly overlap all the way to the top.
Note: the metal pin on the picture, was only put in so I could take the picture.

Step 4:
Attach the ribbon with a metal pin.

Step 5:
Lay the cake boards on the choosen paper. Take your pencil and draw a line around the board on the paper. Cut out wih a pair of scissors.

Step 6:
Take the glue stick and add glue throughly all over the board.

Step 7:
Place the paper cirkel on the cake board and rub it lightly.

Step 8:
Now it is time to attache the ribbon to the side of the cake board. Add a metal pin to just keep the ribbon in place.

Step 9:
If you like you can rub a bit of glue on the side so the ribbon stays in place. End by taking the metal pin and attache it to the overlaps.

Step 10:
Now your cake stand is finished.
Note: I have not assembled my cake stand with glue, but you could do that for an extra safety. If you use iced cake boards you can use royal icing to fix it if you like.

Information Courtesy of CakeJournal.com. THANK YOU!!
{For more information and to read comments with more helpful information, please check out their site by clicking on their name above)

Thursday, September 18, 2008

{WARNING: Do Not Lick Your Screen}

Picture 2
Shame on me for posting something soooooo tempting so early in the day, but I just had to!! Carol at Sugar Buzz Cakes made these absolutely-to-die-for-delicious cupcakes for the NACE (National Association of Catering Executives) dine around this past Tuesday. They were just too adorable for me not to post, but even better was the whip cream frosting that tasted like a little slice of chocolate mouse heaven that sat on top of my favorite little cake ever - pina colada. YUM!! The white ones were just as tasty with their little lemon zing. Carol is a rockstar at creating beautiful dimensional cakes!! THANK YOU THANK YOU THANK YOU!

Wednesday, September 10, 2008

{SWEET Dessert Stand}

Picture 2
How SWEET is this? I found it on Etsy this morning and thought it was a totally rad idea created by The Bee Knees!

Plate + Bowl + Cute Ribbon and Tag = Dessert Stand!!

This takes the cake..Literally! This pedestal cake platter lets your baked goods take the spotlight. Cake stands are both fashionable and functional. Use for cupcakes, candles, cakes, muffins,and desserts. Add a special touch to a birthday party, wedding, bridal shower, or summer cookout. This cake stand will be nothing like anyone else has!

Thursday, August 28, 2008

{1920’s ‘Sweet Cigar Box’ Cookie Bar}

Attention Cigar Partygoers!! 
The only risk involved in this one is…
you won’t just have one!
Picture 4
To put it simply: Fine Event Designer Lea McIntosh never runs out of ideas (as seen on theFlirtyGuide.com). And here she presents a very cute and clever one she dreamt up for a Hollywood Glamour themed party that would be just as perfect for a posh evening wedding.

Certain items just scream luxury. Cigars are one of them. But how does one go about creating a cigar themed buffet that every guest can enjoy? Why turn the cigars into cookies and display them with the same panache and decadence one would expect for the real thing.

I love that for authenticity, each cookie came replete with an actual ‘vintage’ paper cigar label.

The ‘Sweet Cigar Box’ display could be a yummy idea for your event that will not only wow your guests, but will make a lot less smoke and a lot more Mmmmm…

Recipe ideas for these stogie sweets could begin with a myriad of handmade butter tuille, Florentine, and meringue cigar-shaped cookies. Some flavors could include white chocolate pistachio, Valrhona dark chocolate, and butterscotch almond all elegantly displayed in the vintage cigar boxes of your choice.

Tuesday, August 19, 2008

{Smiley Face Cake Pops}

Picture 1
I just had to share these oh-so-adorable cake pops from Bakerella. Wouldn't these be a cute addition at your next party? I bet if you had these out on display, you would be the hit at your next event. It's all about the details, and these lil suckers sure do make you smile!!

Here's how you can make your own!

1 box cake mix (cook as directed on box for 13 X 9 cake)
1 can frosting (16 oz.)
Wax paper
Yellow candy melts (1 lb. pkg.)
Lollipop sticks
Edible ink pens

1.) After cake is cooked and cooled completely, crumble into large bowl.

2.) Mix thoroughly with 1 can frosting. (I use the back of a large spoon, but it may be easier to use fingers to mix together. But, be warned, it will get messy. Also, you may not need the entire can of frosting, so start out by using almost the entire can and add more if you need to.)

3.) Roll mixture into quarter size balls and place on wax paper covered cookie sheet. (Should make 45-50)

4.) Melt chocolate in the microwave per directions on package. (30 sec intervals, stirring in between.)

5.) Dip the tip of your lollipop stick in a little of the melted candy coating and insert into the cake balls. (Insert a little less than halfway.)

6.) Place them in the freezer for a little while to firm up.

7.) Once firm, carefully insert the cake ball into the candy coating by holding the lollipop stick and rotating until covered. Once covered remove and softly tap and rotate until the excess chocolate falls off. Don't tap too hard or the cake ball will fall off, too.

8.) Place in a styrofoam block to dry.

9.) Once dry, draw faces with an edible ink pen and allow ink to dry!

Note: I think cake pops are a little more difficult to make than the cupcake pops because of trying to get the candy coating smooth. So, If you haven't made them before, check out this post for red velvet cake balls and this one for cupcake pops.

Wednesday, July 30, 2008

{Designer Deliciousness! Edible Seating Cards}

Picture 3
What an absolutely adorable way to provide your guests with a personalized favor and seating cards all in one. Edible favors are increasing with their popularity, but I definitely have to say that Sweet Impressions found a way to do some serious multitasking. These adorable edible place cards can be custom designed to the theme of your event! Check them out.

Tuesday, July 22, 2008

{Creative Cakes}

img_0007

Easel Photography/Fleur de Lis cakes- Contemporary Honorable Mention

img_0066
Tammie Coe Cakes-2nd Retro

img_0068
Jay Murphy- 3rd Retro

img_0091
Tammie Coe Cakes- 2nd Place- Vintage

img_0420
Sugar and Bliss- 2nd Place Traditional

img_0422
Vanlatte Custom Cakes-3rd Place Traditional

img_0432
Classic Cakes & Confections-1st Place Contemporary

img_0456
Sedona Cake Couture-1st Place Vintage,Best of Show and Peoples' Choice

img_0458
JW Marriott-1st Place Traditional

img_0466
Let them Eat Cake- 1st Retro

img_0476
Jay Murphy- 2nd Place Contemporary

img_0480

Piece of Cake- 3rd Place Contemporary

I couldn't resist posting some great pictures of these utterly delicious and fabulous cakes from the 2nd Annual Even Elements Competition put on by NACE
www.PhoenixNACE.com

Search This Blog

Followers

Blog Archive

  © The Event Essentials | Designers of Chic Wedding Invitations and Stylish Celebrations | Click Here ---> TheEventEssentials.com

Back to TOP